Posts

Showing posts from August, 2011

IIS Configuration backup and restore step by step

As a security measure you can backup IIS through the following steps. open IIS Manager, right click on local computer => All tasks => Backup /Restore Configuration => Create backup and give the configuration backup name . The backup is stored at the following location C:\WINDOWS\system32\inetsrv\MetaBack

Command Line Command to restart the IIS Service 'iisreset /restart'

How to Start / Stop IIS Services from Command Prompt Open command prompt from start option 1) To start world wide web services c:\>net start w3svc 2) To start the ftp service c:\>net start msftpsvc 3) To start the smtp service c:\>net start smtpsvc 4) To start the plesk control panel service c:\>net start PleskControlPanel 5) To start the HTTP SSL service c:\>net Start HTTPFilter 6) To restart IIS services c:\>iisreset /restart 7) To check the status of the IIS services c:\>iisreset /status To stop the services use stop instead of start in the above 5 commands

How To: Tips to check PSP installed version (HP SIM ProLiant Service Pack)

Image
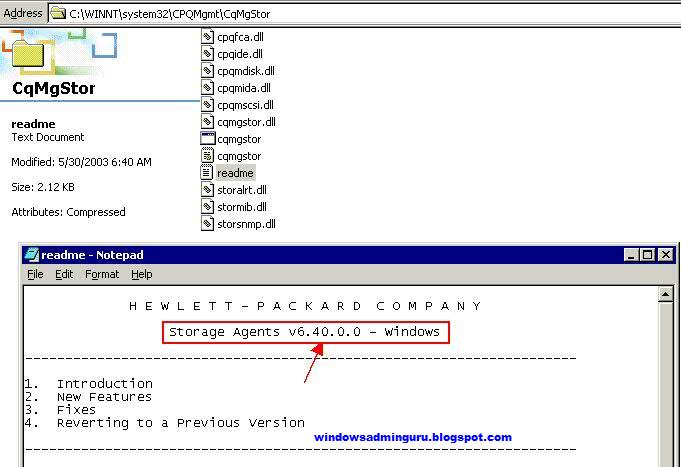
Today's Tip: How to check HP PSP (ProLiant Service Pack) installed version, here goes few easy steps to check - Method 1: 1. Open below said folder on your Windows based HP Server C:\WINDOWS\system32\CpqMgmt\cqmgstor ( Check 'NOTE' below ) Note: This example screenshot taken from Windows 2000 server, in the path, you can change to c:\windows instead of c:\winnt for windows 2003 servers.

'IntelServerBuilder.com' e-retailer offering Free Gifts

Image
Free Gifts Galore   Win Free Gifts (upto 1600/- in value) on your every purchase at www.intelserverbuilder.com * Free Antivirus ( 1 Year, 3 User) worth Rs 200/- with every purchase of less than Rs 3001/-                                                                                               * Free 4 GB USB Flash Drive worth Rs 400/- with every purchase between Rs 3001/- to Rs. 5000/-                                          ...

How To: Steps to add User in Cygwin from Command Line

Adding User / Group in Cygwin from Command Line >$ net user AyamJ password /add /yes >$ net localgroup AyamJ /add >$ mkpassd -l -u AyamJ >> /etc/passwd

How To: Tips to Uninstall the HP Network Configuration Utility

Image
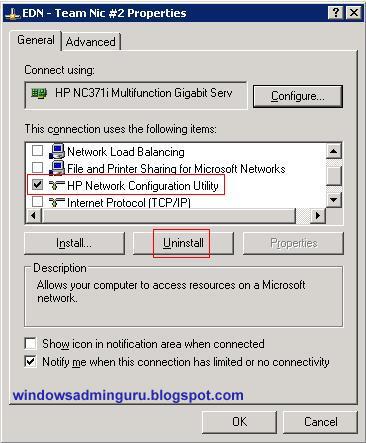
To uninstall the HP Network Configuration Utility, please follow the below steps - Go to Start --> Settings --> Network Connections. Right click on one of the network card and select properties. Under "this connection uses the following items", select the HP Network Configuration Utility and click uninstall. Please follow the picture, if you have any confusion of the above writing -

How To: Network Binding Orders in Windows XP, 2003, 2008 Servers Check

Image
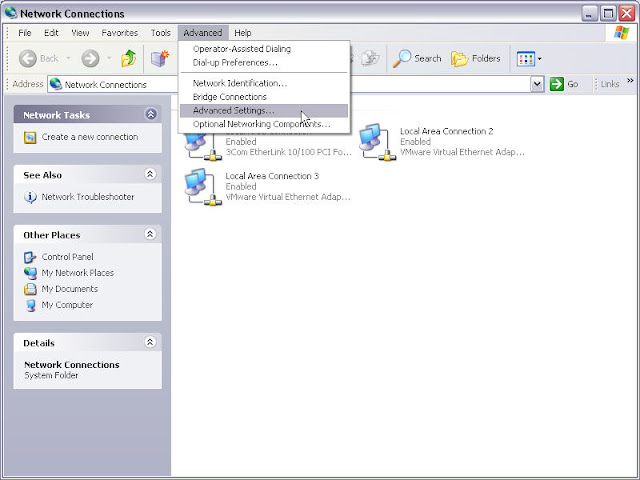
Start / Settings / Control Panel. Click Network and Internet Connections. Click Network Connections. On the Advanced menu, press Advanced Settings. Select the adapter whose Binding Order you wish to change in the Connections box. Use the arrows on the right side of the Binding for to order the protocols. Press OK. If you are prompted to restart, press Yes.

error id: 1722 (0000006ba) - Windows Cluster error -

an error occurred attempting to read properties for the 'cluster group storage exec' resource Here goes the links where you can check the solution for this error message - http://support.microsoft.com/kb/258518 http://support.microsoft.com/kb/829359 http://support.microsoft.com/kb/228480

'jre1.6.0_24.msi' direct download link

Here goes the direct download link of jre1.6.0_24.msi software. http://javadl.sun.com/webapps/download/GetFile/1.6.0_24-b71/windows-i586/jre1.6.0_24-c-l.msi Please leave a comment if you guys face any difficulty in accessing the above link.

How To: Tips to check HP Server Products Warranty Online

Image
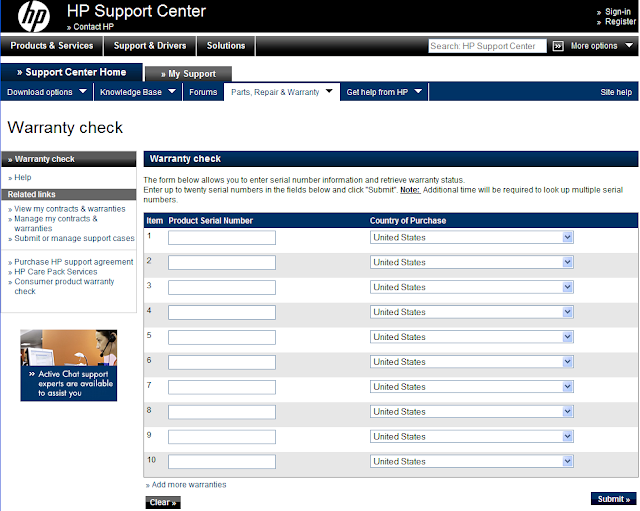
Here goes I'm providing the very useful for System Admins those who are working in the MNC companies. I'm sure this saves lot of time for you guys. Here goes the link to check the HP Server Products Warranty - https://h20566.www2.hp.com/portal/site/hpsc/public/wc/home/ In this page, you can check the warranty information up to 10 servers by providing the product serial number, see the image below -

HP Online Chat Link

HP provides to chat online with their tech support engineers now. You can chat with them by providing the server product number and server serial number online. Once you provide the inputs, some one will assign to you for the chat. HP Instant Support Professional Edition Active Chat Click here to visit the Chat Link

Error: The security database on the server does not have a computer account for this workstation trust relationship - Windows 2008 Server

Image
Today I tried to login one of the windows 2008 server with my domain user id and password, suddenly appeared one error message on the screen as like below - "The security database on the server does not have a computer account for this workstation trust relationship."   Here goes the details information about this error - Cause Starting with Windows Vista and Windows Server 2008, Winlogon will only attempt Kerberos logon. The change was made to achieve higher security in logons that happen across forests. Logon problems may also be caused by the following issues: The trust was created a long time ago, and the NETBIOS name was used to create it resulting in the name resolution used on the trust being NETBIOS, and not DNS. The firewall rules don't allow the Kerberos protocol to pass the firewall, and also not the domain controller locator to find a domain controller (UDP/389). You have already passed the problems above and logon ...

How To: Tips to post on Google+ & Facebook simultaneously

With the entry of Google+, there is a new social network to share your updates and pictures. However, going to each social network's website and updating status is a pain. A simpler way is to use the Circles feature on Google+. First, go to www.facebook.com/mobile, login to your account and on the right side of the page you will see an option to 'upload via email' . Underneath the text, you will see your account specific email address - copy it. Next, Open Google+ and go to Circles. Click on add a new Circle and call it 'Facebook Update'. Click on add a new person and paste yourFacebook account specific email address and save it with any name. Now, whenever you update your status in Google+, simply add this circle in your list and it will automatically post the same status to your Facebook wall as well.