How To: Steps To Import Contacts to Windows Phone 7 – Sync, Import & Transfer
Earlier last month we had written a useful article on Windows 7 Phone Contacts – How to Add, Import, Call and Link which gave you a hint on how you can import all your Phone Contacts through the SIM Card which actually is a very easy job because you can just import SIM contacts with a few tapping, but when the case if of importing the same through different services, then starts the trouble. Since we were earlier using the Apple iPhone and the iPhone contacts were Sync with PC all of them were stored on the Windows as a copy of the same. Now we need to transfer all of these onto the Windows Phone 7.
All the contacts are stored on your computer at C:\Users\UserAccountName\Contacts folder in individual files. You can find a small preview of the same below.


Since Live Contacts actually accepts .csv option you need to select the first option of CSV (Comma Separated Values), then click on the ‘Export’ button. Next you would be asked to select the location on your computer where you would like to store the contacts export file along with the file name in .csv format. Once you mention this you will have to next select all the fields which you would like to export through the contacts option. Once all of them are selected you will have to click on the ‘Export’ button and the file would be generated. You can view the following video for more the same procedure in a understandable way.
The final step would be of Syncing all the imported contacts with your Windows Phone 7 in order to make calls to the same. To perform this task you need to add your Windows Live Hotmail account to your Phone. Tap on the People Icon under the settings and then click on ‘set up account’ option. Next select Windows Live option and you will be asked to enter your Windows Live Email address and Password, followed by signing in. Once this is done, Tap on the back button and then Tap on the ‘import SIM contacts’ option > accounts > Windows Live.
Select the account which you had signed in earlier and then proceed with the sync option in ‘Windows Live Settings’. This can be performed by pressing on the account box for a while which would show you the ‘sync’ option, following which all your emails, contacts, photos and feeds would be synchronized to your device. Next you can easily start making calls to your contacts using the ‘Phone’ option on your device. This completes the task of bulk importing your contacts from any phone to the Windows Phone 7 devices.
Transfer Contacts from Old Phone to PC
The First step is to transfer all your contacts from the current phone to your PC. In case you are using Apple iPhone, then you should check out this article on Backup iPhone Contacts which creates a copy of all the phone contacs onto your computer and is synchronized every time you connect the device to the PC. In case you use any other phone then you should check out this article – Back up your Mobile Phone Contacts online with ZYB. Once you have downloaded and taken a backup of contacts you are ready to move to the next step.All the contacts are stored on your computer at C:\Users\UserAccountName\Contacts folder in individual files. You can find a small preview of the same below.

Export Contacts from PC in .CSV Format
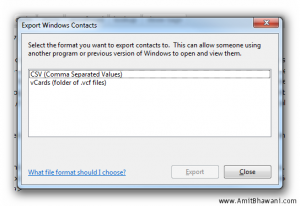
The next task is to Export all the Windows based People Contacts to a format which is acceptable by the Windows Phone 7, in this case the .csv format. Hence on the top of the Contacts section you will find a option of Exporting contacts, click on this and you would get a window called ‘Export Windows Contacts’.
Since Live Contacts actually accepts .csv option you need to select the first option of CSV (Comma Separated Values), then click on the ‘Export’ button. Next you would be asked to select the location on your computer where you would like to store the contacts export file along with the file name in .csv format. Once you mention this you will have to next select all the fields which you would like to export through the contacts option. Once all of them are selected you will have to click on the ‘Export’ button and the file would be generated. You can view the following video for more the same procedure in a understandable way.
Import Contacts to Windows Phone 7
The next step is to Import the above generated file into your Windows Live Account through the option available at http://contacts.live.com , Open the URL through your browser and then login to your Windows Live Account. Next you need to click on the Manage option followed by clicking on the Import Option. Next you would be shown with a option to browse and select the contacts file which was earlier generated in .csv format. Select the same and the Contacts would be Imported in bulk within a few minutes. Do make a note that the contacts file should be lower than 500kb in size or else it cannot be imported. Next you can select different options available in Live Contacts to find find & merge duplicate contacts. The following video can help you a bit in understanding this part.
Syncing Live Contacts
The final step would be of Syncing all the imported contacts with your Windows Phone 7 in order to make calls to the same. To perform this task you need to add your Windows Live Hotmail account to your Phone. Tap on the People Icon under the settings and then click on ‘set up account’ option. Next select Windows Live option and you will be asked to enter your Windows Live Email address and Password, followed by signing in. Once this is done, Tap on the back button and then Tap on the ‘import SIM contacts’ option > accounts > Windows Live.Select the account which you had signed in earlier and then proceed with the sync option in ‘Windows Live Settings’. This can be performed by pressing on the account box for a while which would show you the ‘sync’ option, following which all your emails, contacts, photos and feeds would be synchronized to your device. Next you can easily start making calls to your contacts using the ‘Phone’ option on your device. This completes the task of bulk importing your contacts from any phone to the Windows Phone 7 devices.

Comments